Before and after wipe
When to use
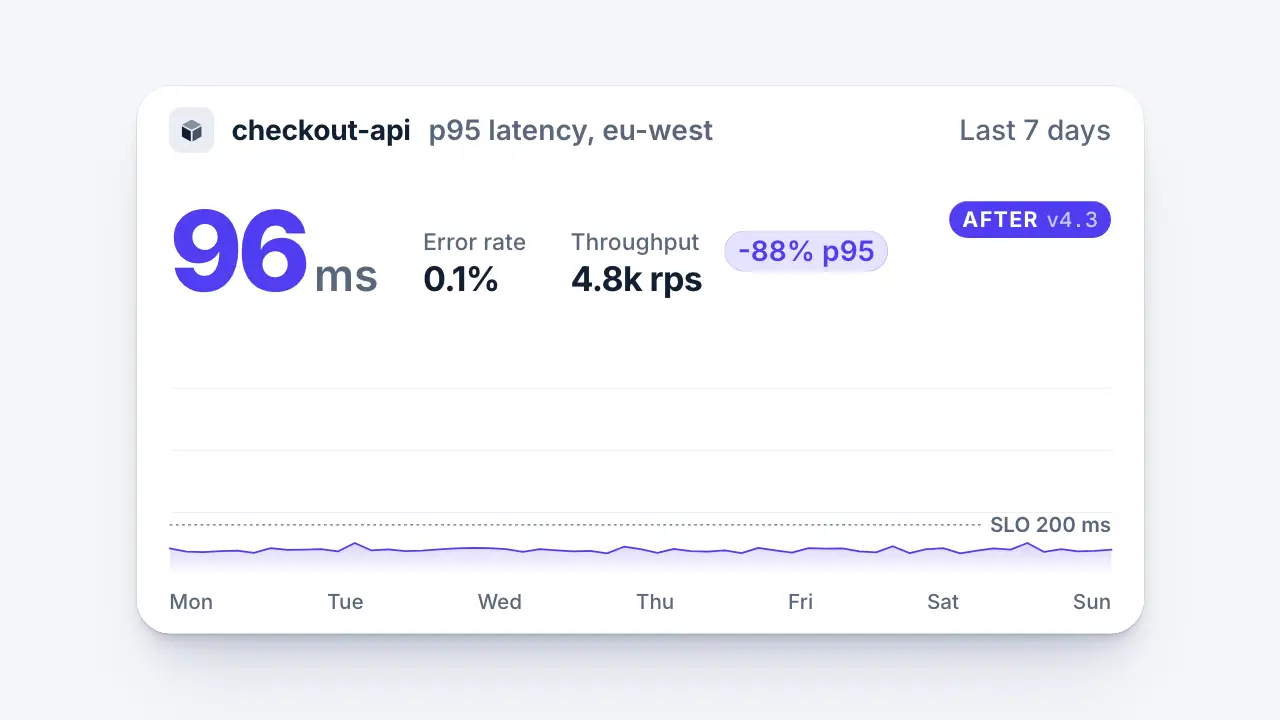
Use when the claim is a change and the change should be a picture: the same card in two states, and a scan line carries the after state over the before. Both states share one layout, so only the numbers and the colour change; the before is grey, the after holds the one accent. Clip: before-after-wipe.mp4. Demo: demo/before-after-wipe.html.
The code
<div class="card">
  <div class="top">...service, metric, range: shared, never wiped...</div>
  <div class="stage">
    <div class="state before"><span class="tag">Before v4.2</span>...812 ms, 2.4%, 1.2k rps, grey week...</div>
    <div class="state after"><span class="tag">After v4.3</span>...96 ms, 0.1%, 4.8k rps, accent week, -88% p95...</div>
    <div class="scan"><div class="grip"></div></div>   <!-- a 2 px accent hairline and a white pill grip with an accent ring -->
  </div>
</div>
<script type="module">
import { EASE } from '../../core/motion/presets.js';
const W = stage.getBoundingClientRect().width, at = 300, dur = 900;
after.animate([{ clipPath: 'inset(0 100% 0 0)' }, { clipPath: 'inset(0 0% 0 0)' }], { duration: dur, delay: at, easing: EASE.settle, fill: 'both' });
scan.animate([{ translate: '0 0' }, { translate: `${W}px 0` }], { duration: dur, delay: at, easing: EASE.settle, fill: 'both' });
scan.animate([{ opacity: 0 }, { opacity: 1 }], { duration: 80, delay: at - 60, easing: 'linear', fill: 'both' });
scan.animate([{ opacity: 0 }], { duration: 160, delay: at + dur - 120, easing: EASE.launch, fill: 'both' });
</script>
Easing and timing
The clip runs 2 s. The look is daylight.
The clip uses 4 named eases from core/motion/presets.js. Each is a pair of After Effects handles: influence is how far along the segment the handle reaches, and speed is how fast the value moves at the key, as a multiple of the segment's average speed. Motion in the docs explains both.
| Ease | Leaving a key | Arriving at a key |
|---|---|---|
glide | 33% influence, speed 0 | 33% influence, speed 0.1 |
land | 12% influence, speed 4.8 | 75% influence, speed 0 |
launch | 33% influence, speed 0 | 25% influence, speed 3 |
settle | 60% influence, speed 0 | 60% influence, speed 0 |
Notes
The clip and the line run the same curve over the same width, so the line is always on the edge of the after state. The curve is the iris curve: a soft start, a fast middle, a soft landing, so the eye has time to read the before and again the after. The line fades in just before it moves and leaves faster than it came; the exit keyframe has no from. Keep what did not change (the service, the metric, the range) in a header above the wipe, so the scan only crosses what changed. Label each state with a tag at the same corner: the tag flips from a grey "Before" to an accent "After" as the line passes it. Put the number the claim rests on (812 ms to 96 ms) at the same spot in both states, and keep a shared reference (the SLO line, the same axis and the same days) so the change is measured, not just stated. Two or three secondary numbers beside the big one make it read as a real dashboard; draw the week from a seeded rng, never a hand zigzag.
Looks (ground, type, radius, accent) live in demo/demo.css; this snippet keeps neutral tokens.
Sound
Sound: bloom at 1.00 s into the move, so its slow peak meets the scan line clearing the card at about 1.15 s (default gain).
Related moves

See all 125 moves. Learn how a page becomes a film in the docs, copy chains of moves from the recipes, or read the motion guide.